Thứ Tư, 3 tháng 6, 2015

Using Eclipse for Android C/C++ Development

Programming in C/C++ on Android is just awesome! This tutorial shows how to setup Eclipse for using C/C++ together with Java in Android projects.
0) Prerequisities
You need to have Google ADT (Android Development Tools) installed. See http://developer.android.com/sdk/eclipse-adt.html how to do it.
You also need Android ndk. Download it from http://developer.android.com/sdk/ndk/index.html and unpack it somewhere.
1) Install CDT (C/C++ Development Tools) into Eclipse.
Choose Help->Install New Software… from the main menu.
Choose http://download.eclipse.org/releases/galileo as the source site. If you have another Eclipse release than Galileo choose the appropriate url.
Click Next, Accept licences and finish the installation process.
2) In Eclipse create Android project to which you want to add C/C++ code (if you already don’t have one).
For this tutorial I’ve created simple MyAndroidProject.
3) In file manager create jni/ directory in your project directory and place your C/C++ sources file here. Also put here Android.mk file which is a makefile that tells Android build-system how to build your files.
Take a look into Android ndk docs/ANDROID-MK.html file how to create one.
Simple example of Android.mk file:
1
2
3
4
5
6
7
8
9
10
LOCAL_PATH := $(call my-dir)
 
include $(CLEAR_VARS)
 
LOCAL_LDLIBS    := -llog
 
LOCAL_MODULE    := native
LOCAL_SRC_FILES := native.c
 
include $(BUILD_SHARED_LIBRARY)
4)  Refresh (F5) directories in Package Explorer to see jni directory here. Open your .c/.cpp file.
Your .c/.cpp file (native.c in my case) contains a lot of syntax errors which are not truly syntax errors. This is because Eclipse threats the project as a pure Java project. We have to convert the project into mixed Java & C/C++ project.

5) Press Ctrl+n (or choose File->New->Other… from main menu) and selectConvert to a C/C++ Project.
This will convert your project into a mixed Java & C/C++ project rather than into pure C/C++ project (the name of the function is misleading).
Click Next. Then choose your project and below choose Makefile project and — Other Toolchain —. Click Finish.


After doing this Eclipse will ask you if you want to switch to C/C++ perspective. ChooseYes because otherwise you wouldn’t be able to set C/C++ build preferences.
6) Click on your project with right button and select Properties or press Alt+Enter
Properties windows will appear. Here you have to configure use of ndk-build instead of make all command and set proper include paths.
7) Choose C/C++ Build and configure ndk-build as a build command
In Builder settings fill ndk-build into Build command entry. You have to uncheck Use default build command. You also need to have ndk-build script in your PATH.


In Behaviour setting uncheck clean (ndk-build cleans project automatically on build and does not support separate clean command) and clear all text from build (ndk-build does not accept all as a parameter.
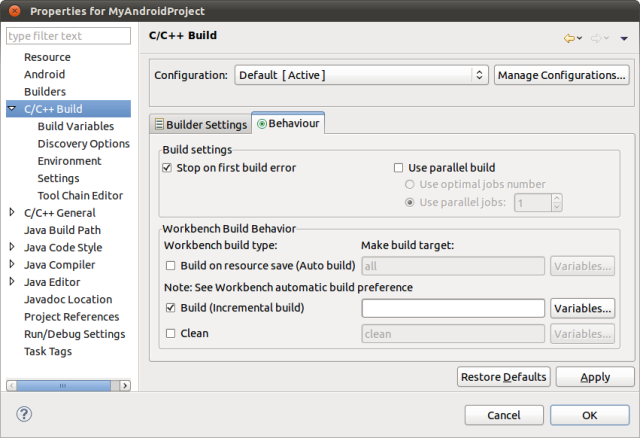
Click Apply to save settings.
8) Choose C/C++ General->Paths and Symbols and configure include path
In Includes tab choose GNU C or GNU C++ and click Add… button. Add path to include directory which is located in platforms/android-4/arch/arm/usr/include subdirectory of place where you’ve unpacked Android ndk. Include path depends on target for which you are compiling (android-4 in my case — i.e. Android 1.6).

Finally click Apply and OK and that is all. Now you can use all Eclipse power for editing your C/C++ sources. If you click Run or Debug Eclipse will compile C/C++ code as well as Java code and run it on device/emulator. However you will not be able to debug C/C++ code.
Have fun!

Using cgdb with ndk-debug (and cgdb tutorial)

Android ndk (http://developer.android.com/sdk/ndk/index.html) comes with ndk-gdbcommand that starts gdb debugger and connects it to Android application.
cgdb (http://cgdb.sourceforge.net/) is superior console front-end to gdb so it seems logical to use it for debugging of Android applications. Following modification of ndk-gdbscript will cause that cgdb will be invoked instead of gdb.

Original ndk-gdb (Android NDK, r10e):
569
570
571
572
# Now launch the appropriate gdb client with the right init commands
#
GDBCLIENT=${TOOLCHAIN_PREFIX}gdb
GDBSETUP=$APP_OUT/gdb.setup
Modified ndk-gdb (originally from Android NDK, r10e) which uses cgdb instead of gdb:
569
570
571
572
# Now launch the appropriate gdb client with the right init commands
#
GDBCLIENT="cgdb -d ${TOOLCHAIN_PREFIX}gdb --"
GDBSETUP=$APP_OUT/gdb.setup
Now if you run ndk-gdb you will get cgdb front-end.

Small cgdb tutorial

In cgdb you can have focus either on source window (part with the source text) or gdbwindow.
To switch from source window to gdb press i.
To switch from gdb window to source press esc.
Commands you can use in source window:
arrows — scroll the text
space — set or delete breakpoint
o — open source file
i — switch focus to gdb window
 — make source window 1 line smaller
= — make source window 1 line bigger
Commands you can use in gdb window:
n — next instruction. Will not dive into subfunctions
s — step. Will dive into subfunctions
c — continue
b — set breakpoint
bt — show call stack (backtrace)
info threads — show information about running threads
info breakpoints — show information about breakpoints
pgup, pgdown — scroll the content of gdb window
esc — switch focus to source windows
Full cgdb documentation is at http://cgdb.sourceforge.net/docs/cgdb-no-split.html
Full gdb documentation is at http://www.gnu.org/software/gdb/documentation/
Have fun!

Parcelable vs Serializable

When starting on Android, we all learn that we cannot just pass object references to activities and fragments, we have to put those in an Intent / Bundle.

Looking at the api, we realize that we have two options, we can either make our objects Parcelable or Serializable. As Java developers, we already know of the Serializable mechanism, so why bother with Parcelable?
To answer this, lets take a look at both approaches.
Serializable, the Master of Simplicity
 1
 2
 3
 4
 5
 6
 7
 8
 9
10
11
12
// access modifiers, accessors and constructors omitted for brevity
public class SerializableDeveloper implements Serializable
    String name;
    int yearsOfExperience;
    List<Skill> skillSet;
    float favoriteFloat;

    static class Skill implements Serializable {
        String name;
        boolean programmingRelated;
    }
}
The beauty of serializable is that you only need to implement the Serializable interface on a class and its children. It is a marker interface, meaning that there is no method to implement, Java will simply do its best effort to serialize it efficiently.
The problem with this approach is that reflection is used and it is a slow process. This mechanism also tends to create a lot of temporary objects and cause quite a bit of garbage collection.

Parcelable, the Speed King

 1
 2
 3
 4
 5
 6
 7
 8
 9
10
11
12
13
14
15
16
17
18
19
20
21
22
23
24
25
26
27
28
29
30
31
32
33
34
35
36
37
38
39
40
41
42
43
44
45
46
47
48
49
50
51
52
53
54
55
56
57
58
59
60
61
62
63
64
65
66
67
68
69
70
71
72
// access modifiers, accessors and regular constructors ommited for brevity
class ParcelableDeveloper implements Parcelable {
    String name;
    int yearsOfExperience;
    List<Skill> skillSet;
    float favoriteFloat;

    ParcelableDeveloper(Parcel in) {
        this.name = in.readString();
        this.yearsOfExperience = in.readInt();
        this.skillSet = new ArrayList<Skill>();
        in.readTypedList(skillSet, Skill.CREATOR);
        this.favoriteFloat = in.readFloat();
    }

    void writeToParcel(Parcel dest, int flags) {
        dest.writeString(name);
        dest.writeInt(yearsOfExperience);
        dest.writeTypedList(skillSet);
        dest.writeFloat(favoriteFloat);
    }

    int describeContents() {
        return 0;
    }


    static final Parcelable.Creator<ParcelableDeveloper> CREATOR
            = new Parcelable.Creator<ParcelableDeveloper>() {

        ParcelableDeveloper createFromParcel(Parcel in) {
            return new ParcelableDeveloper(in);
        }

        ParcelableDeveloper[] newArray(int size) {
            return new ParcelableDeveloper[size];
        }
    };

    static class Skill implements Parcelable {
        String name;
        boolean programmingRelated;

        Skill(Parcel in) {
            this.name = in.readString();
            this.programmingRelated = (in.readInt() == 1);
        }

        @Override
        void writeToParcel(Parcel dest, int flags) {
            dest.writeString(name);
            dest.writeInt(programmingRelated ? 1 : 0);
        }

        static final Parcelable.Creator<Skill> CREATOR
            = new Parcelable.Creator<Skill>() {

            Skill createFromParcel(Parcel in) {
                return new Skill(in);
            }

            Skill[] newArray(int size) {
                return new Skill[size];
            }
        };

        @Override
        int describeContents() {
            return 0;
        }
    }
}
According to google engineers, this code will run significantly faster. One of the reasons for this is that we are being explicit about the serialization process instead of using reflection to infer it. It also stands to reason that the code has been heavily optimized for this purpose.
However, it is obvious here that implementing Parcelable is not free. There is a significant amount of boilerplate code and it makes the classes harder to read and maintain.

Speed Tests

Of course, we want to know how much faster Parcelable is.

The methodology

  • Mimic the process of passing object to an activity by putting an object in a bundle and callingBundle#writeToParcel(Parcel, int) and then fetching it back
  • Run this in a loop 1000 times
  • Do an average on 10 separate runs to account for memory allocation, other apps using the cpu, etc
  • The object under test are the SerializableDeveloper and the ParcelableDeveloper shown above
  • Test on multiple devices - android versions
    • LG Nexus 4 - Android 4.2.2 
    • Samsung Nexus 10 - Android 4.2.2
    • HTC Desire Z - Android 2.3.3

The results


Nexus 10
Serializable: 1.0004ms,  Parcelable: 0.0850ms - 10.16x improvement.
Nexus 4
Serializable: 1.8539ms - Parcelable: 0.1824ms - 11.80x improvement.
Desire Z
Serializable: 5.1224ms - Parcelable: 0.2938ms - 17.36x improvement.
There you have it: Parcelable is more than 10x faster than Serializable! It is also interesting to note that even on a Nexus 10, a pretty simple object can take about 1 millisecond to go through a full serialize/deserialize cycle.

The Bottom Line

If you want to be a good citizen, take the extra time to implement Parcelable since it will perform 10 times faster and use less resources.
However, in most cases, the slowness of Serializable won’t be noticeable. Feel free to use it  but  remember that serialization is an expensive operation so keep it to a minimum.
If you are trying to pass a list with thousands of serialized objects, it is possible that the whole process will take more than a second. It can make transitions or rotation from portrait to landscape feel very sluggish.